Setting up Git, Nginx, and the Server
This post describes the steps to get Hugo running on a new web site. It’s not user-friendly.
I built two sites, one for testing and one for production. I am developing (writing) the site on my laptop.
Create the Server
I created a small server on DigitalOcean.
I installed Nginx for my web server, then created an entry in my ~/.ssh/config file for it called “parking.”
Nginx setup
I created folders for a production and testing website on the droplet.
(The ➜ character is my prompt.)
➜ mkdir -p /var/www/hugocampus.com/public
➜ chown -R mdhender:mdhender /var/www/hugocampus.com

➜ mkdir -p /var/www/testing.hugocampus.com/public
➜ echo 'nginx set up correctly' > /var/www/testing.hugocampus.com/public/index.html
➜ chown -R mdhender:mdhender /var/www/testing.hugocampus.com
I created config files for both sites.
➜ cat /etc/nginx/sites-available/hugocampus.com

server {
  server_name hugocampus.com;
  root        /var/www/hugocampus.com/public;
  index       index.html;
  access_log  /var/log/nginx/hugocampus.com.access.log;
  error_log   /var/log/nginx/hugocampus.com.error.log  crit;

  location / {
    try_files $uri $uri/ =404;
  }
}
(The one for testing is similar, with different paths.)
I copied the configuration files to enable the two sites.
➜ cp /etc/nginx/sites-available/hugocampus.com /etc/nginx/sites-enabled/
➜ cp /etc/nginx/sites-available/testing.hugocampus.com /etc/nginx/sites-enabled/
I tested the configuration, then restarted the Nginx server.
➜ nginx -t
nginx: the configuration file /etc/nginx/nginx.conf syntax is ok
nginx: configuration file /etc/nginx/nginx.conf test is successful

➜ systemctl restart nginx
I wanted HTTPS, so I ran certbot for both servers.
➜ certbot --nginx -d hugocampus.com
Saving debug log to /var/log/letsencrypt/letsencrypt.log
Requesting a certificate for hugocampus.com

Successfully received certificate.
Certificate is saved at: /etc/letsencrypt/live/hugocampus.com/fullchain.pem
Key is saved at:         /etc/letsencrypt/live/hugocampus.com/privkey.pem
This certificate expires on 2025-12-07.
These files will be updated when the certificate renews.
Certbot has set up a scheduled task to automatically renew this certificate in the background.

Deploying certificate
Successfully deployed certificate for hugocampus.com to /etc/nginx/sites-enabled/hugocampus.com
Congratulations! You have successfully enabled HTTPS on https://hugocampus.com

- - - - - - - - - - - - - - - - - - - - - - - - - - - - - - - - - - - - - - - -
If you like Certbot, please consider supporting our work by:
 * Donating to ISRG / Let's Encrypt:   https://letsencrypt.org/donate
 * Donating to EFF:                    https://eff.org/donate-le
- - - - - - - - - - - - - - - - - - - - - - - - - - - - - - - - - - - - - - - -
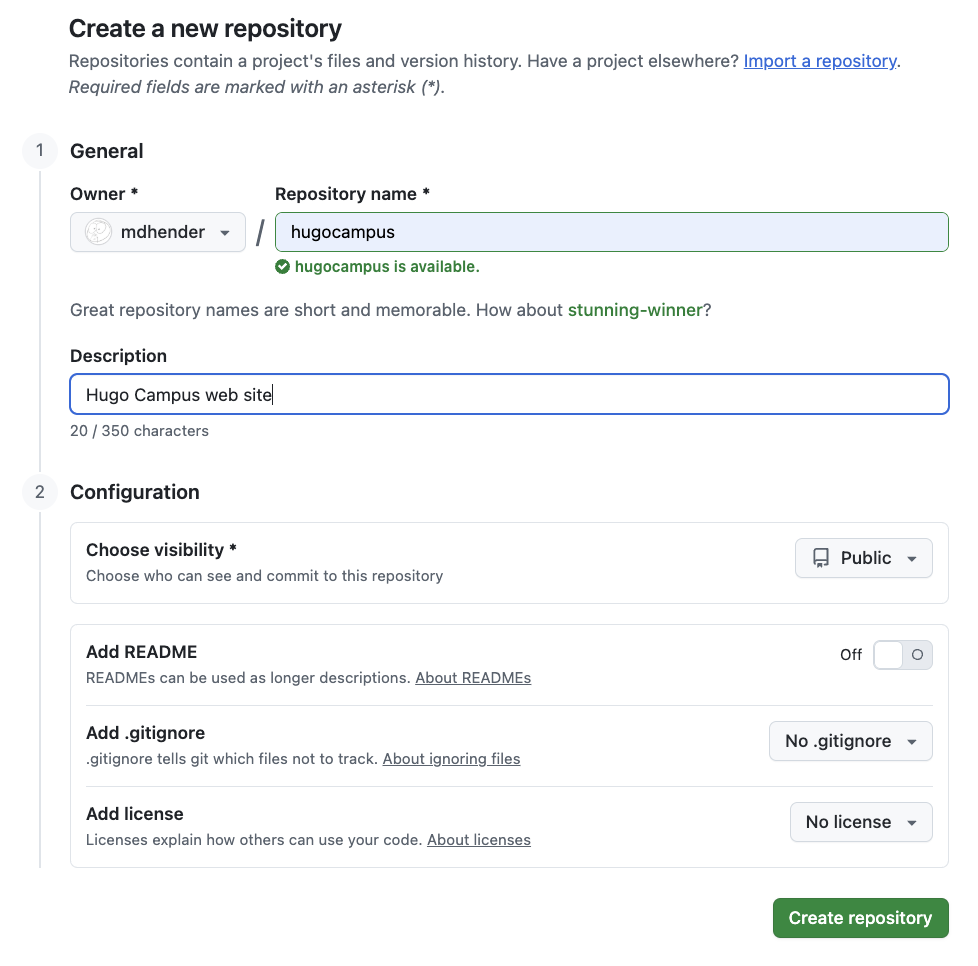
Github
I created a new Github repository to store the Hugo Campus source.
Local setup
I’m on a Mac, so I used brew to install Hugo.
➜ which hugo
/opt/homebrew/bin/hugo

➜ hugo version
hugo v0.148.2+extended+withdeploy darwin/arm64 BuildDate=2025-07-27T12:43:24Z VendorInfo=brew
I created a new site using the hugo new site command.
➜ pwd
/Users/wraith/hugo

➜ hugo new site hugocampus.com
Congratulations! Your new Hugo site was created in /Users/wraith/hugo/hugocampus.com.

Just a few more steps...

1. Change the current directory to /Users/wraith/hugo/hugocampus.com.
2. Create or install a theme:
   - Create a new theme with the command "hugo new theme <THEMENAME>"
   - Or, install a theme from https://themes.gohugo.io/
3. Edit hugo.toml, setting the "theme" property to the theme name.
4. Create new content with the command "hugo new content <SECTIONNAME>/<FILENAME>.<FORMAT>".
5. Start the embedded web server with the command "hugo server --buildDrafts".

See documentation at https://gohugo.io/.
Then I added .gitattributes, .gitignore, COPYING, and README.md files.
➜ cd hugocampus.com

➜ ls -al
total 80
drwxr-xr-x  15 wraith  staff    480 Sep  8 09:24 .
drwxr-xr-x   5 wraith  staff    160 Sep  8 09:18 ..
-rw-r--r--   1 wraith  staff    367 Sep  8 09:15 .gitattributes
-rw-r--r--   1 wraith  staff     25 Sep  8 09:12 .gitignore
drwxr-xr-x   3 wraith  staff     96 Sep  8 08:52 archetypes
drwxr-xr-x   2 wraith  staff     64 Sep  8 08:52 assets
drwxr-xr-x   2 wraith  staff     64 Sep  8 08:52 content
-rw-r--r--   1 wraith  staff  22955 Sep  8 09:02 COPYING
drwxr-xr-x   2 wraith  staff     64 Sep  8 08:52 data
-rw-r--r--   1 wraith  staff     83 Sep  8 08:52 hugo.toml
drwxr-xr-x   2 wraith  staff     64 Sep  8 08:52 i18n
drwxr-xr-x   2 wraith  staff     64 Sep  8 08:52 layouts
-rw-r--r--   1 wraith  staff    542 Sep  8 09:24 README.md
drwxr-xr-x   2 wraith  staff     64 Sep  8 08:52 static
drwxr-xr-x   2 wraith  staff     64 Sep  8 08:52 themes
Next, I ran git init to create my local repo.
➜ git init .
Initialized empty Git repository in /Users/wraith/hugo/hugocampus.com/.git/
➜ git commit -m "initial commit"
[main (root-commit) 97a7418] initial commit
 6 files changed, 496 insertions(+)
 create mode 100644 .gitattributes
 create mode 100644 .gitignore
 create mode 100644 COPYING
 create mode 100644 README.md
 create mode 100644 archetypes/default.md
 create mode 100644 hugo.toml
Note: git ignores the empty directories (assets, content, data, i18n, layouts, static, themes).
I could add a .gitkeep file to each if I really wanted to add them to the repository.
I added my Github repo as the upstream.
➜ git remote add origin git@github.com:mdhender/hugocampus.git

➜ git remote -v
origin	git@github.com:mdhender/hugocampus.git (fetch)
origin	git@github.com:mdhender/hugocampus.git (push)
Then pushed to it.
➜ git push -u origin main
Enumerating objects: 9, done.
Counting objects: 100% (9/9), done.
Delta compression using up to 10 threads
Compressing objects: 100% (7/7), done.
Writing objects: 100% (9/9), 8.98 KiB | 8.98 MiB/s, done.
Total 9 (delta 0), reused 0 (delta 0), pack-reused 0
To github.com:mdhender/hugocampus.git
 * [new branch]      main -> main
branch 'main' set up to track 'origin/main'.
I created scripts to automate deployment for testing and production servers. I didn’t need to do this since I plan on using the repository on GitHub to deploy, but it’s interesting to script file pushes.
(Note: “parking” is the alias for the server in my ~/.ssh/config file.)
➜ tools/deploy.sh parking test
📦 Installing extract script on remote host...
📦 Creating tarball (overlay-safe payload)…
✅ Created tarball: dist/testing/site-20250908-102956.tar.gz
🚀 Uploading to parking ...
✅ Deployed tarball: parking:/var/www/testing.hugocampus.com
🛠️ Extracting on remote server (overlay, no deletions)...
..🛠️ extracting tarball (overlay, no deletions)...
..✅ extract complete (existing files overlaid, nothing deleted).
✅ Extract complete (existing files overlaid, nothing deleted).
📦 Tarball left on server at /var/www/testing.hugocampus.com/site-20250908-102956.tar.gz
🎉 Deployment complete!
You can build out a site without using a theme, but you end up writing the theme in the root level. It is just easier to start out with one.
Create our default theme
I created a new theme, which I called default.
Bad choice for a theme name - it will get confusing to talk about later.
But it is the “default” theme created by Hugo’s new theme command.
➜ hugo new theme default
Creating new theme in /Users/wraith/hugo/hugocampus.com/themes/default
The new theme command includes some sample content that I don’t want, so let’s remove it.
➜ rm -rf themes/default/content
Then update hugo.toml, Hugo’s configuration file, to use the new theme.
While we’re in there, update our baseURL (the path to our production site), and the title for our site.
➜ cat hugo.toml
baseURL = 'https://hugocampus.com/'
languageCode = 'en-us'
title = 'Hugo Campus'
theme = 'default'
Create content
I want the posts for my site to live under blog, so I created folders.
➜ mkdir -p content/blog/post
I created the file you’re reading in there.
➜ ls -l content/blog/posts
total 304
-rw-r--r--@ 1 wraith  staff  139889 Sep  8 09:10 github-repository.png
-rw-r--r--  1 wraith  staff    8520 Sep  8 22:48 initial-setup.md
Building the site
Run hugo server to build the site.
➜ hugo server
Watching for changes in /Users/wraith/hugo/hugocampus.com/{archetypes,assets,content,data,i18n,layouts,static,themes}
Watching for config changes in /Users/wraith/hugo/hugocampus.com/hugo.toml, /Users/wraith/hugo/hugocampus.com/themes/default/hugo.toml
Start building sites …
hugo v0.148.2+extended+withdeploy darwin/arm64 BuildDate=2025-07-27T12:43:24Z VendorInfo=brew


                  │ EN
──────────────────┼────
 Pages            │ 18
 Paginator pages  │  0
 Non-page files   │  1
 Static files     │  1
 Processed images │  0
 Aliases          │  0
 Cleaned          │  0

Built in 10 ms
Environment: "development"
Serving pages from disk
Running in Fast Render Mode. For full rebuilds on change: hugo server --disableFastRender
Web Server is available at http://localhost:1313/ (bind address 127.0.0.1)
Press Ctrl+C to stop
That creates the site in the public/ folder.
➜ ls -l public
total 56
drwxr-xr-x   5 wraith  staff    160 Sep  8 13:15 blog
drwxr-xr-x   4 wraith  staff    128 Sep  8 13:15 categories
drwxr-xr-x   3 wraith  staff     96 Sep  8 13:15 css
-rw-r--r--   1 wraith  staff  15406 Sep  8 13:14 favicon.ico
-rw-r--r--   1 wraith  staff   1529 Sep  8 22:49 index.html
-rw-r--r--   1 wraith  staff   1608 Sep  8 22:49 index.xml
drwxr-xr-x   4 wraith  staff    128 Sep  8 13:15 js
drwxr-xr-x   7 wraith  staff    224 Sep  8 13:15 posts
-rw-r--r--   1 wraith  staff   1124 Sep  8 22:49 sitemap.xml
drwxr-xr-x  11 wraith  staff    352 Sep  8 13:15 tags
I am going to deploy using my scripts, so I’ve temporarily added the public/ folder to my .gitignore file.
We’ll change that later and use a different deployment process.
Deploying the site
As mentioned earlier, I deploy by running a script.
➜ tools/deploy.sh parking test
📦 Installing extract script on remote host...
extract.sh                                                                                                                100%  777    14.6KB/s   00:00
📦 Creating tarball (overlay-safe payload)…
✅ Created tarball: dist/testing/site-20250908-225418.tar.gz
🚀 Uploading to parking ...
site-20250908-225418.tar.gz                                                                                               100%  157KB 813.8KB/s   00:00
✅ Deployed tarball: parking:/var/www/testing.hugocampus.com
🛠️ Extracting on remote server (overlay, no deletions)...
..🛠️ extracting tarball (overlay, no deletions)...
..✅ extract complete (existing files overlaid, nothing deleted).
✅ Extract complete (existing files overlaid, nothing deleted).
📦 Tarball left on server at /var/www/testing.hugocampus.com/site-20250908-225418.tar.gz
🎉 Deployment complete!
And now I can view the site in my browser.
Wrapping up
All that’s left is to commit these changes and then deploy to the production web site.